编辑网站教程高端行业网站建设
课内学习的动态规划
有记忆的迭代
优化解的结构:原始问题的一部分解是子问题的解

三要素:1.子问题 2.状态的定义 3.状态转移方程
定义


线性dp的一道例题

dp[i]表示以位置 i 结尾的方案总数,dp[4]=2,因为:首先只放一个4是可以的,4的位置之前还可以放1,我们不需要知道1之前还可以放什么数,只需要知道1的方案数加上4也是 dp[4] 的一部分方案数。
记得用前缀和来维护所有可行的方案。
二维dp

经验:列常常是1到结果、行常常是是否把这个选项 i 放入考虑范围
例题

首先:为什么用二维dp:对于选择,不能用一条线来解决,需要用一个从1到n的数组,来存储:把第一个选项纳入考虑(只是考虑,不是真放了),到把前 i 个纳入考虑(方便我们在上一个的基础上解决下一个)
注意这里的列坐标是从 1 到 64 ,不是1到x,因为可以由一个比x更大的数异或 ai 后,结果是x,所以我们有必要保存比x大的数,(64的由来:每个进行异或的数大小不超过63,即11111111,所以进行异或和的结果也肯定不会超过11111111,即63)
附上代码
#include <iostream>
using namespace std;const int N = 1e5+5;
const int p = 998244353;
int dp[N][70];
int a[N];int main()
{// 请在此输入您的代码int n,x;cin >> n >> x;for(int i = 1 ; i <= n ; i++){cin >> a[i];}dp[0][0]=1;for(int i = 1 ; i <= n ; i++){for(int j = 0 ; j <= 64 ; j++){dp[i][j] = (dp[i-1][j]+dp[i-1][j^a[i]])%p;}}cout << dp[n][x];return 0;
}
注意:什么样的数字异或 ai 后是 j ? --- j ^ ai 这个数字(这就要用到异或 j ^ ai ^ ai = j)
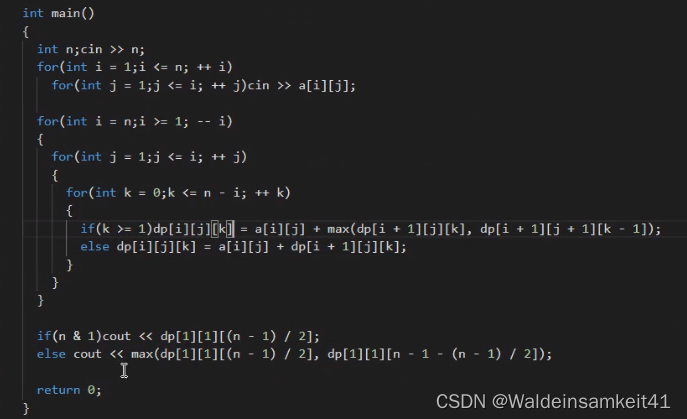
三维dp例题

多一个条件就多了一个维度,来记录k次位移。
附上代码